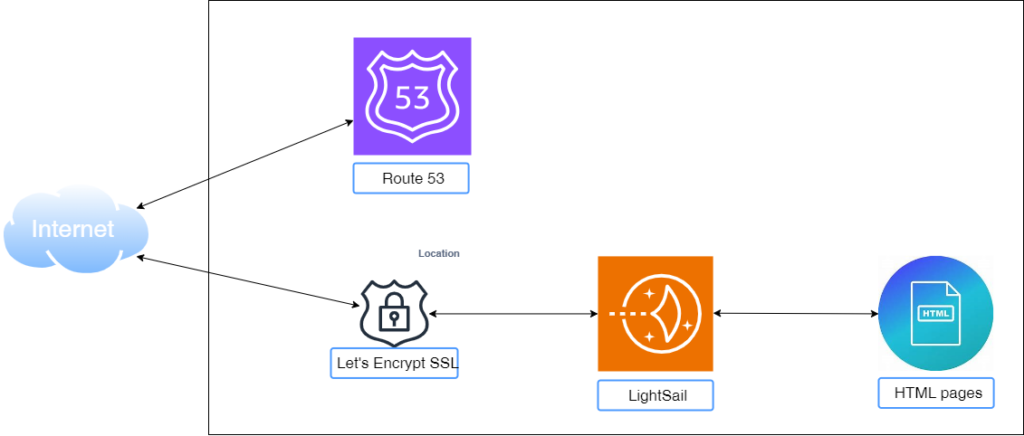
How to use variables, Route 53 and snapshot with AWS LightSail server
This is Part 2 of the Lightsail Web Server configuration using Terraform. You can go to Part 1 for more information. The full code for this project is available at the GitHub repository

From the basic configuration, we will add the following features:
- Using variables when creating different components
- Configure AWS Route 53
- Configure SSL certificate
- Configure snapshot for data recovery
We will now proceed with the configuration. We will briefly explain code as we go along.
1. Using variables when creating different components.
Variables in Terraform are used to store and manage values that are frequently used or need to be changed easily. This can make your Terraform code more:
- Reusable: Variables allow you to define values once and use them multiple times throughout your code, reducing redundancy and improving code maintainability.
- Flexible: By using variables, you can easily modify values without having to edit your code directly. This makes it easier to experiment with different configurations and adapt to changing requirements.
- Secure: Variables can be used to store sensitive information, such as passwords or API keys, in a secure way. Terraform provides mechanisms to encrypt and manage sensitive values.
- Modular: Variables can be used to create reusable modules that can be shared and reused across different projects. This can help you standardize your infrastructure and improve efficiency.
We used variables for each component instead of directly defining values in the main.tf file. For example, instead of defining the AWS region in the main.tf as done in Part 1 as per below
provider "aws" {
  region = "us-east-1"
}
We defined the region in the variables.tf
variable "region" {
  type    = string
  default = "us-east-2"
}
Then in the main.tf, we only use the variable region to define the region in which we are creating
provider "aws" {
  region = var.region
}
You can review all variables we created in the variables.tf file.
2. Configure AWS Route 53
First of all, we created a DNS zone to host our domain
#Create a DNS zone
resource "aws_route53_zone" "mywordpressexample_com" {
  name = var.blog_zone
}
We then created the following DNS records to publish our domain on internet:
- DNS A record for mywordpressexample.com
- DNS A record for www.mywordpressexample.com
- DNS AAA record for mywordpressexample.com
- DNS AAA record for www.mywordpressexample.com
# Create a dns record for the blog
resource "aws_route53_record" "blog_record_example" {
  zone_id = aws_route53_zone.mywordpressexample_com.zone_id
  name = var.domain_name
  type = "A"
  ttl = "300"
  records = [aws_lightsail_instance.wordpress_instance.public_ip_address]

}

# Create a dns record for the blog - www
resource "aws_route53_record" "blog_record_example_www" {
  zone_id = aws_route53_zone.mywordpressexample_com.zone_id
  name = var.domain_name_www
  type = "A"
  ttl = "300"
  records = [aws_lightsail_instance.wordpress_instance.public_ip_address]

}

# Create ipv6 dns record for the blog
resource "aws_route53_record" "blog_record_example_ipv6" {
  zone_id = aws_route53_zone.mywordpressexample_com.zone_id
  name = var.domain_name
  type = "AAAA"
  ttl = "300"
  records = [aws_lightsail_instance.wordpress_instance.ipv6_addresses[0]]

}

# Create ipv6 dns record for the blog - www
resource "aws_route53_record" "blog_record_example_www_ipv6" {
  zone_id = aws_route53_zone.mywordpressexample_com.zone_id
  name = var.domain_name_www
  type = "AAAA"
  ttl = "300"
  records = [aws_lightsail_instance.wordpress_instance.ipv6_addresses[0]]

}
Note that the domain needs to be registered to be able to access the website using its domain name.
3. Configure SSL Certificate
An SSL certificate is a digital certificate that authenticates a website’s identity and enables an encrypted connection. SSL stands for Secure Sockets Layer, a security protocol that creates an encrypted link between a web server and a web browser.
Lightsail makes it easy to secure your websites and applications with SSL/TLS using free SSL certificate from Let’s Encrypt. You can follow the AWS LightSail step-by-step guide to set the SSL certificate.
4. Configure snapshot for data recovery
Creating snapshot of the Lightsail server is by simply adding the code below to the Lightsail instance creation block code
add_on {
          snapshot_time = "06:00"
          status        = "Enabled"
            type        = "AutoSnapshot"
        }
We specified the snapshot to be taken automatically everyday at 6am. The full block code to create the lightsail server and configure snapshot becomes
#create a Lightsail instance
resource "aws_lightsail_instance" "wordpress_instance" {
  name = var.instance
  blueprint_id = var.blueprint_id
  availability_zone = var.availability_zone
  bundle_id = var.bundle_id

  tags = {
    Environment = "My Personal Blog"

  }
   add_on {
          snapshot_time = "06:00"
          status        = "Enabled"
            type        = "AutoSnapshot"
        }
}
Summary
In this post, we first demostrated how to use variables in Terraform to store and manage values that are frequently used or need to be changed easily. We then created the necessary components to register our domain with Route 53, which is the AWS DNS service. Finally, we configured automatic snapshots to protect our website content.
I hope you enjoyed reading this post!