How to add CloudFront and Route 53 to your S3 website?
In our previous post, we discussed the deployment of AWS S3 as a static website. While we managed to get the static website up and running, we still have some improvements we can do to make it more user-friendly.

Firstly, the website was configured with the default S3 bucket URL such as https://your-bucket-name.s3.amazonaws.com. While this can be accessed from the internet, it is not easy to remember.
Secondly, the fact that the S3 bucket was created in a specific AWS region may result in latency for users far from this region. This may not be a major drawback for a simple website that is not heavy nor accessed by a lot of internet users at the same time. However, in the opposite case, it would be beneficial to improve the performance and availability of your web content by caching your content closer to your users.
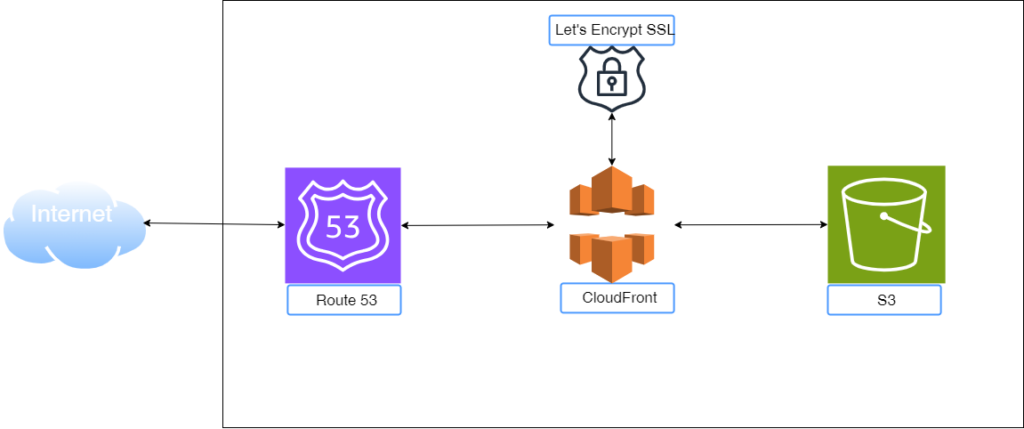
In this blog post, we will discuss how we can used AWS Route 53 DNS service to configure our own domain to publish the S3 website. But before that, we will use AWS CloudFront to publish the website. But first we will briefly explain the two AWS services.
What is AWS Route 53?
Route 53 is Amazon Web Services’ (AWS) Domain Name System (DNS) service. It translates human-readable domain names into machine-readable IP addresses, allowing users to access websites and applications. Route 53 is used to manage DNS records, route traffic, and improve website performance and reliability.
What is AWS CloudFront?
CloudFront is a Content Delivery Network (CDN) service provided by Amazon Web Services (AWS). It improves website performance by caching your content closer to your users, reducing latency and increasing availability. This makes your website load faster and more reliably for users around the world.
Configuring CloudFront for S3 website
resource "aws_cloudfront_distribution" "static-website-smw" {
  origin {
    domain_name = aws_s3_bucket.static-website-smw.bucket_domain_name
    origin_id   = aws_s3_bucket.static-website-smw.id

    custom_origin_config {
      http_port              = 80
      https_port             = 443
      origin_protocol_policy = "https-only"
      origin_ssl_protocols   = ["TLSv1", "TLSv1.1", "TLSv1.2"]
    }
}
  enabled             = true
  is_ipv6_enabled     = false
  default_root_object = "index.html"
  restrictions {

    geo_restriction {
      restriction_type = "none"
    }
  }
  default_cache_behavior {
    viewer_protocol_policy = "redirect-to-https"
    allowed_methods        = ["GET", "HEAD"]
    cached_methods         = ["GET", "HEAD"]
    target_origin_id       = aws_s3_bucket.static-website-smw.id

    forwarded_values {
      query_string = false

      cookies {
        forward = "none"
      }
    }
  }

  viewer_certificate {
    cloudfront_default_certificate = true
  }
}
While we cannot go into details all the configuration parameters of a CloudFront distribution, they are mandatory sections that you should define.
- The origin: defines the origin of our content. In this case, we defined the domain name and the ID of our static website S3 bucket.
- Distribution enablement: By setting
enabled = true, we allow the distribution to serve content. - Restrictions: You can limit access by geo-location. In our case, it is set to
none - Default cache behavior: A number of parameters can be configured here. But the following must be defined:
- Viewer protocol policy: To define which protocol between http or https are to be used. The options are
allow-all, redirect-to-https,https-only. This is self-explanatory! - Allowed and Cached Methods: In our case, we defined GET and HEAD
- Target origin: to specify once again where the content is fetched from.
- Viewer protocol policy: To define which protocol between http or https are to be used. The options are
- Viewer certificate: This is to create an SSL certificate for https. If we are using the default
cloudfront.netdomain name as in this case, we need to setCloudFrontDefaultCertificatetotrue.
Configure Route 53 to setup custom domain name.
The process to configure DNS for any resource involves creating the following in the most cases.
- DNS Zone such as
sergewiclef.com - DNS A records such as
sergewiclef.comandwww.sergewiclef.com.
You can refer to our previous post to learn how to configure DNS.
Summary
This blog post discusses how to improve a static website hosted on an S3 bucket. The first improvement involves using AWS CloudFront, a Content Delivery Network (CDN), to cache website content closer to users for faster loading times. The post explains what CloudFront is and then dives into the configuration process. Finally, the post mentions using AWS Route 53, a DNS service, to configure a custom domain name for the website, making it more user-friendly.
Hope you enjoyed reading this post!